
The material you choose can make a big difference in the end result of a renovation project, especially when it comes to your home’s walls and ceilings.
The material you choose affects efficiency, the potential for water damage, and aesthetics.
It’s best to know the different options and what makes each one stand out from the others.
Villaboard comes up as an option regularly, but many homeowners don’t have a complete understanding of what villaboard is and when to use it.
What Is Villaboard?

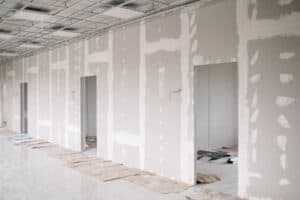
Villaboard, or fiber cement, is a wall lining or ceiling lining for the interior of your home or the siding on the exterior of the home.
Fiber cement goes on top of the insulation or vapor lining when used for an interior wall.
After you install villaboard, you can use it as a backboard for tile, paint, or wallpaper.
Most people apply villaboard in bathrooms, basements, and kitchens due to its water-resistant properties, but it works well as a wall material in numerous other rooms and even outside.
What Is Villaboard Made From?

Manufacturers make villaboard from fiber cement, a composite material.
Composite material usually consists of cement, sand, water, and cellulose fibers.
At one time, asbestos was included in fiber cement, but that practice ended a long time ago.
All villaboard is entirely safe for interior use and will not reduce the quality of the air your family breathes.
Villaboard Sizes And Style Options

Villaboard most commonly comes in panels of various lengths and widths and a thickness of ¼” or ⅜”.
The thickness of ¼” villaboard is most commonly used for residential purposes while ⅜” villaboard is most commonly used for commercial applications.
Panels come with either square edges that work best when applying to butt jointing or recessed edges that work best with flush jointing.
Benefits Of Villaboard

There are a lot of benefits to using villaboard as a building material, including water resistance, fire resistance, strength, versatility, and aesthetic appeal.
Water Resistance

Villaboard does not succumb to water damage.
If water does manage to seep through, it doesn’t ruin the structural integrity of the material since the material is made to dry itself out without degradation.
Fire Resistance

Villaboard comes with an impressive Class 1(A) rating, the highest possible, for preventing the spread of fire.
This prevents fires from growing quickly and causing more damage.
Strong

Villaboard is naturally quite strong.
Villaboard can support tiles of up to 33 pounds in weight.
It also makes a great option if you plan to hang heavy items from the walls since it has high levels of bonding properties.
Smooth Finish

Villaboard is a premium sanded product with an attractive and smooth finish.
In some cases, you may not even need to put tile or wallpaper over the material, especially if you choose a high-quality finish to use on the villaboard.
Versatility

Villaboard works well in a number of different situations as a heavy-duty replacement for plasterboard or drywall in both residential and commercial applications.
You can use villaboard as a wall in the bathroom, basement, laundry room, and kitchen due to its exceptional ability to resist water.
It also works well in areas of high traffic, such as the living room, due to its high level of impact resistance.
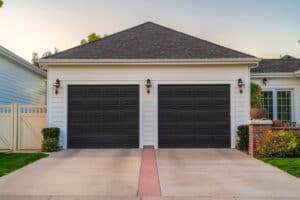
Finally, villaboard can also make a great exterior home siding.
Villaboard Vs. Plasterboard

Both villaboard and moisture-resistant plasterboard will work well in high moisture areas, and they make up the majority of interior walls in residential buildings.
While these two products appear similar, they have distinctions that set them apart.
One of the major benefits of villaboard compared to plasterboard is its tensile bond strength.
Tensile bond strength refers to a material’s ability to withstand weight such as a mirror or picture frame.
Villaboard has 75% more tensile bond strength than plasterboard when it is dry and 300% more tensile bond strength than plasterboard when it’s wet.
Villaboard also works better in high traffic areas due to its increased ability to resist impacts.
Some people prefer to use plasterboard due to its lower cost.
It also generally comes with higher efficiency ratings.
Limitations Of Villaboard

While it is a great option overall, you should also understand the limitations of villaboard to make a fully educated decision.
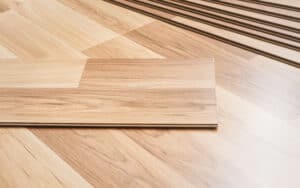
Villaboard does not work well as a flooring material.
Also, fiber cement doesn’t provide the highest levels of efficiency, meaning you may need to look for other ways to improve the protection of your home from the elements.
Wall Assembly

Before you install villaboard in your home, you should understand wall assembly and the different components of your wall.
We will cover basic parts of your wall assembly from the inside out.
Interior Sheath

The interior sheath refers to the finished wall that you see on the inside of your home and where you hang items in your home.
It is usually made out of villaboard or drywall.
It may have paint, tile, or wallpaper covering it.
Vapor Barrier

The vapor barrier in the wall goes on top of the insulation to prevent moisture damage to your walls.
This is used in moderate to cold climates.
Common vapor barrier materials include tar paper and polyethylene.
Frame

The frame of the wall provides structural support for the wall.
This is usually made out of wooden planks, but masonry can also be used.
Insulation

Insulation is material that prevents air from flowing through the wall, and you will find it in the middle of the frame.
For the wall, most people use fiberglass batting or polyurethane foam.
Fiberglass batting is the least expensive, but it also doesn’t work nearly as well as the more expensive polyurethane foam.
Exterior Sheathing

The exterior sheathing is the wood on the very outside of the wall on the other side of the frame from the interior sheathing.
Siding

On the other side of the exterior sheathing is the siding.
You have a wide range of options for siding, including fiber cement.
Other popular siding options include:
- Vinyl
- Brick
- Wood
- Metal
Installing Villaboard As Interior Wall

Installing villaboard yourself can save you money and help you feel a stronger connection to your home.
Follow these simple steps to install villaboard as an interior wall.
Step One: Gather Materials

First, you need to gather the necessary materials to get the job done.
The main materials you need include:
- Villaboard panels
- Fiber cement cutter
- Fiber cement sheeting nails
- Metal corners
- Tin snips
Tools you will need include:
- Hammer
- Ladder
- Measuring tape
- Straight edge
Finally, you need to remember to stay safe by using the following protective gear:
- Gloves
- Safety glasses
- Work boots
Step Two: Prep The Area

Now that you have everything you need, it’s time to prepare your workspace and the walls.
Start by ensuring you have proper ventilation while you work by keeping a door or window open.
You also may want to put down a tarp to simplify clean-up after the job is finished.
You also want to ensure that your wall assembly meets the requirements of local building codes, especially regarding the thickness of the wall and the evenness of the studs.
Step Three: Mark Villaboard Placement

Before you actually place the villaboard, mark the placement of the boards.
Since you will work from top to bottom, mark the wall every four feet (the length of the villaboard).
Also, mark the middle of the stud you plan to use when placing panels next to each other.
Installing the villaboard in the middle of the stud increases the strength of the installation.
Step Four: Create A Nail Ledge

Increase support by creating a nail ledge.
A nail ledge refers to a row of nails nailed halfway into the joists just underneath the lines you marked for where panels will join together.
Step Five: Place Top Row Of Villaboard

When installing villaboard, it’s best to work from top to bottom.
Lift the villaboard panel (which may require assistance) and put it in place on top of the nail ledge.
You will then nail the villaboard to secure it.
Continue the practice all around the top of the room.
Step Six: Install Metal Angles

Nail metal angles in the corners of the internal walls of the room to add support with the same nails.
Step Seven: Place Second Row Of Villaboard

Now, you will install the second row of villaboard underneath the top row around the entire room.
Put the boards in place and nail them to secure them.
Step Eight: Place Short Villaboard Panels

Short villaboard panels are the panels that fit into the awkward or smaller pieces of the wall throughout the room.
First, you need to cut the villaboard to the exact right size using a fiber cement cutter and your measuring tape.
Never use a circular saw when cutting villaboard inside.
It’s also important to ensure you wear the proper protective gear.
Install the short villaboard panels by placing them and securing them with your nails.
Step Nine: Cut Holes For Utilities

The walls may house plumbing or electrical wiring.
If necessary, cut out the holes where you need access to these utilities.
Step Ten: Clean Up

After any project, make a point to clean up afterward.
The biggest mess will come from cutting the villaboard.
Do not dry sweep any debris from cutting the material.
Instead, you want to pick it up with a wet towel or mop it up.
Villaboard Finishes

Villaboard usually requires a finish, depending on its location inside your home.
The main point of the finish is to prevent glancing light.
Glancing light refers to the ability to see through the wall, including the joints.
Seeing the joints can reduce the aesthetic appeal of your home and diminish the impact of your unique styling choices.
The effects of glancing light become more apparent in very bright rooms, especially with a high gloss, light-colored paint.
Levels Of Finishes

Villaboard comes in five different finish ratings to help you determine which will work best for you.
The higher the finish level, the more it protects from glancing light.
The finish ratings are as follows:
- Level 1: Tape. No excess drywall mud and may contain imperfections. This is mostly used in hidden areas.
- Level 2: Tape and basecoat. May contain minor imperfections. You will see this finish most often in storage areas and garages.
- Level 3: Tape, basecoat, and topcoat. Mostly used in rooms with minimal light and traffic.
- Level 4: Tape, basecoat, topcoat, and edge sheets. Appropriate for most residential purposes.
- Level 5: Tape, basecoat, topcoat, and recessed edge sheets. Best in severe glancing light situations.
Tiles

Tiles look great, but they also add significant weight to the wall.
Luckily, villaboard supports tile weight better than many other options.
For residential villaboard, you don’t want to exceed a tile weight of 33 pounds.
Each tile should not exceed the size of 11” x 11”.
Finally, you should not place tile higher than 10 feet.
Tiles should not go on the ceiling.
They should only be installed on the walls or the floor.
Fiber Cement Exterior Siding

Fiber cement siding refers to the villaboard used on the exterior of your home.
The popularity of this relatively new material in construction is growing fast, now making up 15% of siding in new residential construction.
As a siding, you need to consider different things compared to your indoor walls.
As an exterior wall to your home, you need a product that holds up against the elements efficiently.
How does fiber cement exterior siding hold up?
Fiber cement siding makes a great weather-resistant, fire-resistant, and long-lasting exterior wall option.
In fact, you should expect the siding to last 50 years for non-back-coated materials and 75 years for back-coated materials.
This makes it great for places with high levels of rain.
It can even hold up pretty well against hurricanes! It also works as a great exterior siding in areas threatened by wildfires, such as California.
That doesn’t mean that fiber cement siding doesn’t come with its own problems.
Fiber cement siding generally requires professional installation compared to vinyl which many intermediate handymen can do themselves.
Also, while durable and resistant to rain and fire, the material allows quite a bit of air through the home, leading to poor efficiency ratings.
This can lead to higher utility bills, especially in the summer and winter.
Final Thoughts On Villaboard

Villaboard makes a great option as an interior wall sheathing material due to its water resistance, fire resistance, fair cost, strength, appearance, and durability.
You can install villaboard yourself with the proper knowledge and guidance, but it does usually prove more difficult to install than drywall, which is the other main interior sheathing option.
After it is installed, you will apply a finish to the material to ensure that it properly hides the contents of your wall assembly, particularly the joints.
While usually used as an interior building material, villaboard can also work as an exterior house siding.
As a water-resistant material, it makes a great option in areas with a lot of rain and moisture.
However, it doesn’t have the best efficiency ratings.
Ultimately, villaboard makes a great option for interior walls, ceiling, and exterior siding, especially in situations with high moisture levels.

nice job