
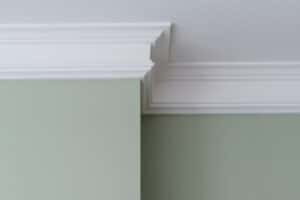
Crown molding can make a room look complete and give you an updated look that you may need in your home.
However, sometimes the crown molding that you have in place will not be the perfect match anymore.
There are times when you may find that removing the molding completely is easier than painting it or adding different elements to it.
Crown molding is kind of a pain to put up, but luckily, it won’t be all that difficult to get it down.
As long as your crown molding was installed by a professional who took the standard steps to put it in place, you should be able to get it down without much trouble.
Let’s take a look at how to remove crown molding and the steps that are involved in this process.
Even if you are not the handiest person out there, you should be able to complete this process rather easily.
How To Remove Crown Molding (Step-By-Step)

The steps to remove crown molding should be the same regardless of the crown molding design or pattern that you have.
In addition, if your crown molding is a foam product or a wood product, the steps will also probably be the same or at least close.
If at any time you feel as though you may be doing more damage than good by trying to remove the crown molding yourself, then you can always look into hiring a professional.
However, if you are looking to save money, this is a relatively easy project to take on without the help of a professional.
Step 1: Prepare The Area

The first part of this process is to make sure that your area is prepared for the project you are about to take on.
Even though there are much messier projects out there than removing crown molding, this is a process for which you are going to want to be able to have an easy clean-up after the fact.
The clean-up process will quite a bit easier if you take some time beforehand to get the area ready.
We like to put down drop cloths or plastic sheets in the area where you will be removing the crown molding.
You can expect that there will be quite a bit of dust and some of the old caulk or paint chips that are going to come off the wall at the same time.
If you don’t have a drop cloth or sheet in place, you are going to have a large mess on your hands to clean up.
Step 2: Safety Check

Once your area is set up and ready for you to start working, you can add in some safety checks to make sure that you are ready to start the work.
When you are working with crown molding, remember that the molding is going to be located over your head.
When you are reaching up, you have to make sure that your face is protected.
To do this, you are going to want to make sure that you have safety glasses on for any debris that may fall from the crown molding.
In addition, it is probably a good idea to wear a mask so that you are not breathing in dust and particles in the air.
When pulling the crown molding off the wall, there will be nails, and sometimes the paint or wood could be splintering as well.
This is where you will want to make sure that your hands are also protected.
Getting a great pair of gloves that fits your hands properly but also ensures that you are able to get work done is a smart idea.
The last thing you want is an injury or issue like that to slow down your progress of removing your crown molding.
Step 3: Utility Knife Scoring

Now that your area is prepared and you have the proper safety equipment in place, it’s time to start.
The first step in this process is that you will want to loosen the connection that the crown molding has with the wall.
You have to consider that when the crown molding was put up, the idea was to have it look as seamless as possible.
You will want your crown molding to be securely attached to the wall and have that clean look, but then, when it needs to come down, you must break this connection.
Most of the time, when you put crown molding up, caulk is used to fill in any of the joints or seams.
There is always a gap between the molding and the wall, and this must be filled in order for it to have a smooth and cohesive look.
Now, when it comes time to remove the crown molding, you are going to have to ensure that this seam is broken.
Take a utility knife and score all the areas where you can see caulking and some kind of wood filler that would be connecting your molding to the wall.
This scoring process is necessary because it will prevent additional damage to the wall, and it will make the overall removal process quite a bit easier.
Ensure that you do this around all different areas of the room.
We like to score the area at the ceiling as well as the area on the wall.
By hitting both of these areas with your utility knife before you start to remove the molding, you are going to save yourself both time and frustration.
Step 4: Find The Joints

Once you have the top and the bottom of the molding scored with your utility knife, it is time to find the joints.
Even though the crown molding in your room may look as if it is made up of four very large pieces, it is very likely many more than four pieces.
When crown molding is put up, there are usually boards that are about six or eight feet used to do the larger sections.
Then, in addition to these larger sections, small boards are going to fill in the gaps.
In the end, it is important to realize that you are going to be dealing with quite a few pieces of crown molding.
If it looks as though your crown molding is all one piece, it is because someone did an excellent job of putting it up around your home.
You will need to then ensure that the seams where the pieces of crown molding meet are found and then separated.
If the seams are not scored or separated, you will have a very hard time removing a single piece of the crown molding.
Find those seams on the wall and simply score them with your utility knife.
As great as this molding may look, it is probably just a very small piece of caulk that is holding these two seams together to make it look like one.
Once you have this area scored, you are then ready to move to the next process of actually starting to pry the molding off the wall.
Step 5: Pry Bar

For this part of crown molding removal, you will need to purchase a pry bar.
Pry bars come in a variety of sizes, and it is best to choose a smaller one when working with crown molding.
Although smaller pry bars can have a bit less power and strength, they are also much easier to work within tight spaces.
The pry bar should only be about a foot long or so, as you won’t want anything bigger when standing on a ladder trying to get this done.
In addition to the pry bar, you will need a hammer.
Make sure that one end of the pry bar has a thin and sharp edge to it.
Chances are this edge will be smaller and thinner if you have purchased the shorter pry bar.
You will want to start on one side of the room, where you can see a gap between the crown molding and the wall.
When you scored the wall, you probably found an area with a much more visible or apparent gap between the molding and the wall.
This is where you will start this process.
The key to working with your pry bar is to remember that any damage that you cause to the wall in the process is going to have to be fixed by you as well.
You can rush through the removal of crown molding just to get it done and move on, but you will be stuck having to deal with this cleanup entirely on your own in the end.
Instead, go slowly, look for those gaps between the wall and the molding, and start there.
We highly recommend using light pressure in the beginning.
Sometimes the nails used to install crown molding can be quite small, and they will come out with ease.
Other times, you will be working a while to get this to pry away from the wall.
Essentially, you will take the sharp end of the pry bar, push it up under the crown molding, tap it with the hammer, and then work your way along the length of that entire piece of molding.
Step 6: Continue Working Along With The Piece

The best way to go about this process is to stick with one piece at a time.
As you move along with one piece, it will eventually start to move away from the wall.
As each piece comes down, some of the stability they had by being attached to other pieces of crown molding will also start to loosen.
The best way to keep this process neat and to avoid any additional damage to the wall is to continue working with one piece at a time until each piece is ready to come off the wall.
When you feel as though your own hand strength could pull the molding from the wall, it is time to move to the next step.
Step 7: Pull Off With Two Hands

Now that the molding is loose and it is feeling as though it is not as well connected to the wall, you can start to pull it with two hands.
It’s a good idea to use both of your hands so that you can control the way that the molding comes down.
If you use one and then it swings on the way down, it can cause damage to the wall or even hit you.
Ensure that you have a good footing on your ladder, and then pull the molding away from the wall using both hands at the same time.
You will feel right away if there are still some nails that are continuing to grip the molding tightly.
Some contractors will also use glue when they put crown molding up, so you may have to contend with that.
Chances are the glue that was on the walls from years ago has dried out a bit and will now barely be holding on to the molding.
When you pull your molding away from the wall, always be mindful that you are not pulling hard enough that it makes you lose your balance.
Safety should be your primary consideration in every step of this process.
Step 8: Remove Nails And Clean Up Backing

Once you have taken the molding off the wall, don’t be so quick to toss it in the dumpster.
People will pay good money for molding even if it has been on your walls for 30 years.
With the current pricing of wood, you may be able to get a fairly good amount of money to put towards your next crown molding design.
Removing nails and cleaning up the backing on the old molding is your next step.
This process is quite a bit easier because you will be working on the ground and not having to reach above your head.
When you remove the nails, try to use a hammer or a pair of pliers to pull them through.
Do the best you can to ensure that there is little damage done to the crown molding.
In addition, you will want to take a putty knife or scraper of some kind and ensure that you get any old caulking or glue off of the molding as well.
At this point, you won’t have to sand or paint the molding because the person who purchases it from you will likely be doing that.
You can post your molding for sale on local buy, sell, and trade groups, and chances are you will find someone who is more than willing to take it off your hands.
If you don’t care about the money but just want to make sure the product gets recycled, this is very easy to make happen.
Simply list the molding for free, and you will likely have people fighting over it.
What Is The Process For Removing Base Molding?

Now that you are an expert at removing the crown molding in your home, you may want to know what you can do about base molding.
Base molding removal is actually going to be very similar to crown molding removal.
You will want to ensure that you create that gap as best you can between the wall and the molding.
With base molding, you may be contending with different types of floors, and this could impact the access that you have to the molding itself.
Most of the time, if you work from the top down, this will fix any of the flooring issues that you may have.
When working with base molding removal, make sure that you score the walls the same way you did with the crown.
One thing that we like much better about working on base molding is that you don’t have to be on a ladder, and you will find it to be a much more comfortable position to work from.
As soon as you get on a ladder and have to reach over your head, things get more complicated.
It always seems easier to pry base molding from the wall than it is to get the crown molding to move away.
Does My Home Need Crown Molding?

When you remove the crown molding from your room, maybe you decide that things look better without it in place.
There is no rule about decorating or home improvement that says that everyone must have crown molding.
However, most people associate it with a higher-end finish in a home.
Homes with crown molding tend to sell for more money because of the finished look.
People look at a room that has crown molding around it, and they realize that time and effort has been put in to make this room look like something out of the ordinary.
If you are looking to sell your home and are worried about resale value, crown molding can be a good addition.
If you have no plans to sell the home, and you don’t like the look of the crown molding, then don’t be concerned with it.
There are ways to put crown molding up in a reasonably affordable way as well.
You can work on getting it in place by building it up with smaller pieces of molding and having the overall look be more built-up or put together.
In the end, this will still be a great look and one that is worth considering if you are trying to save money.
Of course, you always have the option of buying salvaged molding from another home or project.
With what we taught you about how to remove molding, chances are you can find some molding that was removed properly and install it in your home.
Conclusion

Hopefully, you can now see that removing crown molding is not all that difficult.
If you have some essential tools available to you and work diligently and make your way around the room, crown molding should not be hard to remove.
Make sure that you take your time so that you do not end up with a mess on the walls.
The last thing you want to find is that there are holes in the wall, or it has been pulled and ripped in areas where that is not necessary.
Ensuring that the walls are clear and that you can easily patch them up and get them looking good again is essential.
Another thing to keep in mind when removing your crown molding is to make sure that you are able to salvage the molding itself.
If you can ensure that you keep it in good shape, you may sell it for a good amount of money.
Regardless of the home improvement project that you are working on, saving money is always a positive.
One more thing: As with any home improvement project you choose to take on, safety should always be your first consideration.


Leave a Reply