
Fixing crown molding corners is a project many homeowners have on their home improvement to-do list.
The gaps, seams, and joints tend to happen at almost any intersection.
If you live in an area where the temperature and humidity change quite often, you will notice that this problem tends to get a bit worse.
The corners of your crown molding don’t need to be difficult to fix if you follow a few simple steps.
Here are the steps to help fix crown molding corners in your home.
How to Fix Crown Molding Corners

These are the basic steps to fix crown molding corners.
If you find that you have quite a bit of an issue throughout your entire house, you may want to hire a professional.
However, this process should not be all that difficult.
Step 1: Gather Supplies

For this process, you are going to need both caulk and spackle.
When using caulk, it is best to use a caulk gun.
The caulk gun helps to make sure that you get the caulk evenly spread out across the molding joints.
In addition, you are going to need a spackle.
We recommend using a lightweight spackle.
Unless you have an issue with every corner in your home, a small jar of lightweight spackle should do the trick.
Normally, when using a spackle, you will need a spackle knife, but it is just as easy to use your fingers for this project.
Lastly, you will need to make sure that you have sandpaper.
When the project is almost complete, you will need to sand off any areas that are no longer smooth.
- Sandpaper
- Lightweight spackle
- Caulk
- Caulk Gun
- Rag
- Paint
Step 2: Fill the Gap

The first step is to fill the gap between the two pieces of molding.
Although this is mostly going to be found in corners, don’t hesitate to fill any gaps that you may find in seams as well.
Sometimes the seams are going to stand out as a problem almost as much as the corners.
Take a bit of spackle and fill the gap with the caulk.
You will want to make sure that there is no visible space between the two pieces of wood at this point.
If the caulk starts to come out a bit and it has filled the void more than you expected, that is not a problem.
It is fine if this is not perfect as there are still more steps involved.
However, we do recommend trying to do as neat of a job as possible.
Otherwise, you will very likely create more work for yourself in the end.
Once the gap is filled, you can move to the next step.
Step 3: Spackle

Before starting the spackle, make sure the caulk is completely dry.
Depending on what type of caulk you used, you will notice that the drying time will vary.
It’s important to consider this drying time so that you can make sure the caulk is a stable base for putting the spackle on.
Next, you will work with the lightweight spackle.
The spackle should be a bit like clay, but it won’t be quite as moldable.
Still, you will have some ability to mold this spackle into the shape you need it to be.
This is where you will want to try and get the exact shape you need.
This spackle is quite easy to feather out and smooth out.
You can push it around with your fingers, and it will be a bit like an art project.
If this spackle does not look perfect, but it still does an excellent job of forming the shape that you need, that is completely fine.
You will still have to complete another step of sanding once the spackle dries.
Overall, you should try and move through this process at a fairly fast pace.
The spackle tends to get a bit sticky when you allow it to dry for too long.
Step 4: Sanding

Now you will need to take a look at the lightweight spackle you have been using and do a check of the drying times.
The drying time will differ for each spackle, but you don’t want to start sanding until your spackle is completely dry.
In fact, when you start sanding wet spackle, you will make a bit of a mess and potentially ruin the shape you have just created.
Once the spackle is dry, take some sandpaper in your hand and start to smooth out the area that you just fixed.
Sanding this spot is going to help make sure it looks as though two natural pieces of wood are fitted together.
There is almost no way to get the spackle perfect using your fingers or a spackle knife.
However, when you do this with the sandpaper, you can get it to look smooth and as if it is one piece of wood.
You won’t have to push down hard when you are sanding; simply keep it light and get the area smoothed over and ready for paint.
The great thing about using this spackle in the crown molding corners is that it will not contract or expand.
This will help to make sure that the corners always look smooth and leave you no gaps.
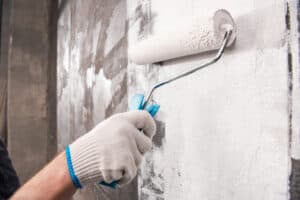
Step 5: Paint

The last step of this process is to throw a coat of paint on your newly repaired molding.
Freshly painted crown molding can undoubtedly change a room and make it look much more finished.
You may need to use painter’s tape when painting your crown molding.
It is very easy to paint both the ceiling and the wall accidentally as you are trying to get the molding to look great.
We highly recommend taking your time, as properly painted crown molding can certainly add value to a house.
Why Does My Crown Molding Have Gaps?

Did your crown molding always have gaps, or is this a new thing?
When you purchased your house, do you remember the molding has seams in the corners?
Chances are, you might not have noticed this issue because it could have been hiding.
Yes, the gaps, seams, and joints in crown molding corners can change from time to time.
Most of this change has to do with temperature and humidity.
When it is hot and the humidity is up, things tend to expand.
This includes wood.
Not only is your crown molding likely made of wood, but so are the studs and trusses that it is hanging from.
Therefore, if all of this wood is expanding, it starts to create gaps and cracks.
When the winter comes, and everything shrinks back down to its normal size, these separations may become even more visible.
Depending on the time of the year, the issue that you have on your hands could look a little more severe.
As you probably remember reading in our step-by-step guide, using spackle is a good solution for this.
If you use a lightweight spackle, you likely won’t have to worry about splitting and cracking over time.
This product seems to hold up a lot better than caulk does.
Does Crown Molding Increase the Value of My Home?

If the corners in your crown molding have you wondering if it is even worth keeping crown molding in your home, you may want to consider the value.
Putting crown molding in your home will probably not increase the value dollar for dollar.
However, it is a feature some people will look for and one that they do appreciate.
Therefore, if someone is choosing between two houses, even if yours is priced a bit higher, it could be the one that is chosen.
Of course, for crown molding to help increase the value of your home, it needs to be done right.
The molding should be made with more than just a thin piece of wood, and there should be a good amount of detail to the crown molding.
The molding will also have to be painted so that it looks aesthetically pleasing as well.
Sometimes a house will have several rooms with crown molding and others without.
Usually, if someone has taken the time to put crown molding in, they have probably put base molding in place as well.
If you happen to have gaps or seams in your base molding, you can fix them the same way that you fix the crown molding.
Do I Need to Use a Caulk Gun to Fix Crown Molding?

As we mentioned in our guide, it is best to use a caulk gun when applying caulk to your crown molding.
The reason behind this is that the gun makes it much easier to dispense the caulk.
When you try to use the squeezable tube of caulk, the project can get quite a bit more complicated.
The tube is a bit like working with toothpaste.
Sometimes it only dispenses a little at a time.
If you are working with a long seam along with your entire ceiling, this is going to get very frustrating.
You will also have to do a lot more manual work to fill in the gaps evenly.
Another great reason to use a caulk gun is that you will likely be working over your head.
Chances are, if you are working on crown molding, you will be standing on a ladder and reaching up to fix the issues.
If you add into the equation that you also have to squeeze the caulk out of a tube manually, the process is going to get even more complicated.
A caulk gun is not an expensive tool to keep, and you can use it from one project to another.
You won’t have to worry about replacing your caulk gun after each use.
Simply clean the tool up before you put it away, and it will be ready for use the next time.
Try to pay attention to the size of your caulk gun so you can always purchase a tube of caulk that fits exactly inside.
Caulk has a wide range of uses, from fixing molding to plumbing repairs as well.
Conclusion
The process of fixing crown molding corners does not need to be complicated.
In fact, even if you are not all that handy, you can use this simple guide to get you through the process.
Always keep in mind that this project can get a bit messy.
If you drop caulk or spackle or even paint down from the ceiling, it could end up being challenging to get off your floors.
Always put a drop cloth down when doing any type of work like this.
The sanding will create a good amount of dust, but the drop cloth should help to collect that as well.


Leave a Reply